Welcome to my blog. I would like to create a place where I can share my love of crafts with you. I started paper crafting in August of 2011. I just had my one year anniversary. I love making cards, doing scrapbook pages, creating flowers, quilling and many other crafts. I found out about greeting cards when watching a Stamp TV video a few months later. I am hooked on card making now. Love everything about it. I hope that you will join me in my love of crafts.

Wednesday, September 16, 2015


Welcome to this weeks post with Heartfelt Creations. We are debuting the Enchanted Mums Collection. It is a gorgeous collection of stamps, flowers, papers, and dies. I absolutely love the colors and theme of this collection, and I am really enjoying working with it. I hope you will stop by Heartfelt Creations blog and see all of the inspiration from the rest of the design team, and don't forget to pick up this new collection.


Project Instructions: 

Other products: Copic Markers E79 - YG25 - V28, Light green cardstock (CS)

Instructions: 
Take a piece of the Enchanted Mum paper collection and make a 6" by 6" card base. Take two more pieces of cardstock from the paper collection and cut the smallest and next to smallest dies from the Spellbinders Oval Bliss die set. Color the edges with Copic Markers. Add Double Dots to the smaller one, that is a sentiment. Stamp three sets of Enchanted Mums in black ink. Cut them out with the matching die. Color the edges of the flowers and the dragon flies with Copic Markers. Stamp the dragon fly leaves in black ink, and cut it out with the matching die. Glue it to the card base then add the ovals. Glue the flowers together adding three flowers to each set, then add them to the card.

Thank you for stopping by my blog!!

Wednesday, September 2, 2015

September 1, 2015

Welcome to this weeks post with Heartfelt Creations.
This is the last week of the Farmers Market Collection. Next week we will be debuting the Enchanted Mums Collection. I can't wait for you to see it. You are going to love it.

Stop by Heartfelt Creations to pick up your Farmers Market collection, and by Heartfelt Creations blog to see all of the inspiration from the rest of the Design Team.

Thank you for stopping by my blog!!!

Other products: Wisteria cardstock (CS), Copic Markers Y13 - YG06 - 13 - 21- 63, E34 0 35 - 37, BV01, R32 - 30, N0 - 01, Spellbinders Grand Scalloped Ovals

Instructions: 
Take the matching card panel From the Farmers Market paper collection and make a 6" by 6" card. Take the Decorative Scalloped Oval die and cut it with wisteria CS. Take the second smallest Grand Oval and cut in paper from the paper collection. Stamp the Farmers Market Peaches in black ink. Color them with Copic Markers, then cut the image out with the smallest Grand Scalloped Oval. Glue the three die cuts together and add Double Dots to the back. Glue it on to the card. Cut two sentiments from the paper collection and add Double Dots to the back, then glue them to the card.
Have a wonderful day!!!

Wednesday, August 26, 2015

August 26,2015 HC

Welcome to this week's post with Heartfelt Creations.
I am using the Farmers Market Collection for my card this week.
I love everything about this collection, and it is so perfect for this time of the year,

I hope you will stop by Heartfelt Creation's blog and take a peek at all of the inspiration from the rest of the design team,


Other products: Cardstock green - white, Copic Markers YG0000 - 21 - 00 - 13 - 11 - 06 - 63 - 67, BV0000 - 01 - 13, glitter pen.

Instructions: 
Take a card panel from the Farmers Market collection and trim it to 5 1/4" by 5 1/4". Place it on a 6" by 6" green card base. Stamp the jugs and berries on white cardstock, with black ink. Color them with Copic Markers. Cut them out with the matching dies. Add Double Dots to the backs of them, and place them on the card. Stamp the leaves on papers from the paper collection with black ink. Cut them out with the matching die. Add them to the card. Cut a sentiment from the collection and add Double Dots to the back. Add it to the card. Add clear Wink of Stella to the berries on the sentiment and to the other berries.

Thank you for stopping by my blog!!
I hope you are having a wonderful week.

Wednesday, August 19, 2015

Welcome to this weeks post with Heartfelt Creations.
I am loving the Farmers Market Collection. It has some amazing stamps, dies, and papers.
I colored my first apple this week. It was a lot of fun experimenting with different colors.

I hope you will stop by Heartfelt Creations and pick up this new collection.
You will be inspired by what you can create. Especially with Fall right around the corner.

Stop by Heartfelt Creations blog to see all of the inspiration this week.


Other products: Memento Dandelion, Morocco inks, Spellbinders Grand Decorative Ovals (smallest), white and red cardstock (CS), Copic Markers R20 - 22 - 27 - 29, YG 25 - 63 - 67, Y00, W0 - 01 - 02, Martha Stewart paper punch
Instructions: Take a piece of the Farmers Market paper collection and make a 6" by 6" card base. Add a red scalloped edge with a paper punch. Take the Cut Mat Create 2B, largest rectangle die, and cut out the matching papers. Stamp the Apple Harvest image on white CS with black ink. Color it with markers. Cut it out with the Grand Oval die. Add a red layer to the back with the Decorative Oval Die. Add Double Dots to the back. Cut out the sentiment and add Double Dots to the back. Add all of the elements to the card.

Thank you so much for stopping by my blog!!!!

Wednesday, August 12, 2015

August 11, 2015 HC

Welcome to this weeks post with Heartfelt Creations. 
I hope you are having a wonderful week.

We are introducing the Farmers Market Collection this month. I am loving this collection. The whole collection is amazing. Stop Heartfelt Creations Blog for all of the creative inspiration from the rest of the design team.

I made a card for you this week I hope you enjoy it and are inspired to create something for that special person in your life.


Other products: White - green cardstock (CS), scissors, Spellbinders Grand Calibur - Labels Thirty Eight, Copic Markers N0 - 02 - 04, V22 - 25, B000 - 00 - 02, Y13 - 19,                                    YG21, YG17, E11 - 34 - 35 - 43

Instructions: Make a 6" by 6" side folding, card base from the Farmers Market Paper Collection. Add a 5 3/4" by 5 3/4" layer to the front of the card. Stamp the Jars and Vines on white CS with black ink. Color it with the Copic Markers. Cut it out with the Labels Thirty Eight Die. Take some green CS and cut out the vines with the matching die. Sponge the edges with green ink. Add it around the image and then add Double Dots to the back. Place it on the right side of the card. Cut out the matching images from the paper collection and add Double Dots to the back of them. Place them on the card.

Wednesday, August 5, 2015

August 5, 2015 HC

Welcome to this week's post with Heartfelt Creations.

This is the last week with the Sparkling Poinsettia Collection.
We will have a new collection coming out next week called the Farmers Market. 
You are going to love it. I can't wait to show it to you.

Stop by Heartfelt Creations blog this week for all of the inspiration by the rest of the design team.
I hope you are having a wonderful week so far, and enjoy the card I made this week.

Instructions: Take a piece of the Sparkling Poinsettia paper collection and make a 6" by 6" card base. Cut a card 4" by 5" card panel from the paper collection and glue it to the front of the card. Cut two of the 2" by 3" images and glue them to the card in opposite directions. Cut three of the 1 1/2" by 1 1/2" images from the paper collection and add Double Dots to the backs. Glue them to the card in opposite directions.

Thank you so much for stopping by my blog!!!!!

Wednesday, July 29, 2015

July 29,2015 HC

Welcome to this weeks post with Heartfelt Creations.
I hope you are having a wonderful week. I made a Christmas card this week with 
Stop by Heartfelt Creations Blog for all of the inspiration from the rest of the design team.

Thank you so much for stopping by my blog. 
I always love hearing your amazing comments.


Project Instructions: 

Other products: White cardstock (CS), gold ink, Grand Calibur
Watch this video to learn how to shape the Sparkling Poinsettia.
Instructions: Make a 5" by 7" card base, then take a 5" by 7" card front from the paper collection. Glue them together. Stamp the Sparkling Poinsettia Swirl, sentiment onto the front of the card in black ink. Stamp two of the Large flowers Sparkling Poinsettia onto burgundy paper from the paper collection, and two of the of the flowers from the Sparkling Poinsettia. Cut them with the matching die. Add gold ink to the edges of the petals then glue them together. Add Art Institute Glue to the centers and then add the Heart of Gold Prills to the glue. Glue the flowers to the front of.

Have a blessed day!!

Wednesday, July 22, 2015

July 22, 2015 HC

Welcome to this weeks post with Heartfelt Creations. 
I made a card for you this week with the Sparkling Poinsettia Collection.

I hope you enjoy Christmas in July. 

Stop by Heartfelt Creations for all of the inspiration from the rest of the design team members.


Products Used: 

Project Instructions: 

Other products: Spellbinders Labels Forty Decorative Elements, white - red cardstock (CS), Copic Markers E30 - 34 - 35, N02 - 04 - 06, Y11, B000 - 01, silver ink, rhinestone flower centers, die cutting machine
Instructions: Fold white CS to make a 5" x 7" card base. Cut a piece of striped paper from the paper collection to 4 3/4" by 6 3/4" to the card base. Next add a 4 1/4" by 6 1/4" card front to the card base. Stamp the Joy to the World stamp onto white CS with Black ink, and color it with Copic Markers. Cut it out with the Cut Mat Create 1A largest rounded rectangle die. Cut the Spellbinders die in red CS. Glue them together and place them on the card. Stamp six of the Sparkling Poinsettias onto burgundy paper from the paper collections in black ink. Cut them out with the matching die. Add two to each flower and add silver ink around the edges. Place the flower centers in the three flowers. Cut four of the flourishes from the Cut Mat Create 1A die with white CS. Add the flowers to the card and then place the flourishes around the flowers.

Thank you so much for stopping by my blog!!


Wednesday, July 15, 2015

July 15,2015 HC

Welcome to this week's post with Heartfelt Creations. 
I used the Sparkling Poinsettia Collection for this week's card.
I hope you enjoy what I have made.
Stop by Heartfelt Creations Blog for all of the inspiration this week.


Project Instructions: 

Other Products: Cardstock: white, green, Silver Lustre; Copic Markers: flowers N0 - 2 - 4 - 6, Candle Y00 - 02 - 06 - 08 - YR4, Leaves: G40 - 43 - 46, gold metal findings, cream lace, Spellbinders Curved Borders Three.

Instructions: Take a piece of the Sparkling Poinsettia Paper Collection and make a 6" by 6" card base. Take the curved borders and cut a 2 1/2" by 6" border for the bottom of the card. Take a piece of the paper collection and make a layer to go behind it. Glue an 8" piece of lace to the top, and then add Double Dots to the back. Add it to the bottom of the card. Take a piece of white cardstock and stamp the Sparkling Poinsettia Candle and sentiment in black ink. Color it with Copic Markers. Cut the image out with Cut Mat Create 2A rounded rectangle, and the sentiment out with the Cut Mat Create 1B smallest rounded rectangle die. Add Double Dots to the backs of both. Add them to the card. Stamp three of the Large Sparkling Poinsettia flowers in black ink onto the lustre cardstock. Cut them out with the matching die. Add Gold Wink of Stella to the edges of the petals. Mold and shape them with the Flower shaping Kit. Glue them together and add the gold finding to the center of the flower. Glue it to the card, and add three more gold findings to the right upper part of the card.

Thank you so much for stopping by my blog!!
I appreciate all of your comments.

Wednesday, July 8, 2015

July 8, 2015 HC

Christmas in July!!
Welcome to this weeks post with Heartfelt Creations. It is time for our Christmas cards, and the release of our Sparkling Poinsettia Collection.
This is what Heartfelt Creations has to say about this new collection.

Rediscover the majesty, serenity and pageantry of Christmas with Heartfelt Creations' Sparkling Poinsettia Collection.  This glorious ensemble of stamps, dies and papers captures the stately splendor of Christmas with a regal color palette of burgundy, evergreen, taupe and cream.  Radiant poinsettias take center stage amidst a host of traditional Nativity scenes, twinkling candles, drifting snowflakes, lacy flourishes, exuberant banners and Heartfelt  greetings that are worthy of the King of Kings.  Six detailed stamp sets echo the glorious images found in the paper collection and two coordinating die sets can be used to create sparkling poinsettias that will never wilt or fade.  Chronicle sweet memories of the season, share holiday joy with family and friends, hail the holy babe born in the manger and deck the halls with Sparkling Poinsettia!

Stop by Heartfelt Creations blog for more inspiration, and don't forget to stop by Heartfelt Creations to pick up the new collection.


Other Products: Copper embossing powder, white cardstock, pearlescent gold ink, rhinestones, Memento Sweet Plum ink, heat gun.
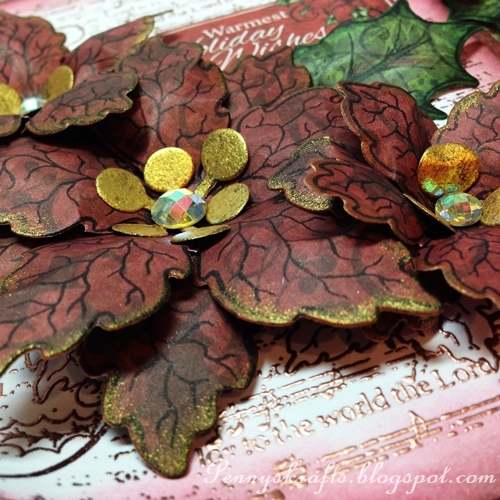
Instructions: Take a piece of the Sparkling Poinsettia Paper Collection, and make a 6" by 6" card base, and a 4 3/4" by 5 3/4" layer. Glue them together. Take a piece of white cardstock and stamp the Sparkling Poinsettia Notes with the Essential Glue Pad. Cover it with copper embossing powder, and heat set. Trim it to 4 1/2" by 5 1/2". Sponge the edge with Sweet Plum ink. Curl the top and bottom of the image. Glue it to the card. Stamp the Sparkling Poinsettia flowers onto paper from the paper collection in black ink. Cut them out with the matching die. Sponge the edges and stamens with gold ink. Mold and shape them with the Flower Shaping Kit. You will need two for each flower. Glue the stamens onto the flowers, and then add the rhinestones. Glue them onto the card. Stamp leaves from the Large Sparkling Poinsettia, then cut them out with the matching die. Sponge the edges with Cottage Ivy ink. Shape them and glue them around the flowers. Cut a sentiment out from the paper collection, and add Double Dots to the back. Place it onto the card.

Thank you for stopping by my blog!!
I have been a little out of touch. I  am still dealing with an illness, but I am finally starting to feel better.
I appreciate your comments so much! Thank you.

Wednesday, July 1, 2015

July 1, 2015 HC

Welcome to this weeks Post with Heartfelt Creations.
I am showcasing the Blazing Poppies Collection this week. I hope you enjoy what I have made.
Stop by Heartfelt Creations Blog for all of this weeks inspiration.


Other Products: Memento Markers Bamboo Leaves, Lady Bug, scissors.
Instructions: Take paper from the Blazing Poppy Paper Collection and make a 6" by 6" card base. Next take the 6" border strip from the paper collection. Stamp the Poppy Border in black ink, across the bottom. Color the flowers and leaves with Memento Markers. Glue it to the bottom of the card. Cut out the sentiment from the paper collection, with scissors. Also cut some of the flowers and butterflies from the paper collection. Add Double Dots to the back of the sentiment and some of the flowers. Place them on the card as shown in the photo.

I hope you have a wonderful July 4th!!
Thank you so much for stopping by!