Welcome to my blog. I would like to create a place where I can share my love of crafts with you. I started paper crafting in August of 2011. I just had my one year anniversary. I love making cards, doing scrapbook pages, creating flowers, quilling and many other crafts. I found out about greeting cards when watching a Stamp TV video a few months later. I am hooked on card making now. Love everything about it. I hope that you will join me in my love of crafts.
Showing posts with label HC Dies. Show all posts

Wednesday, April 15, 2015

April 15, 2014

Welcome to this weeks post with Heartfelt Creations.
I am loving the masculine theme of the Everyday Heroes Collection. I have not made many masculine cards and I am having so much fun with this collection. 

I just love the color palette of the papers. The dies are so versatile, and the stamps can be used so many different ways. 
 I loved distressing and sponging this card. The nautical theme leaves you so much room for colors and designs.

Don't forget to stop by Heartfelt Creations blog to see the rest of the design teams gorgeous projects.

I hope you like the card I made this week. 


Project Instructions:

Other Products: Blue Raspberry - black - Neenah White cardstock (CS), Distress inks - Tumbled Glass - Spun Sugar - Squeezed Lemonade - Old Paper - Black Soot, water, paper towel.
Instructions: Cut a piece of black CS to 6" by 12" to make a 6" by 6" top folding card base. Take a piece of blue CS and trim it to 5 7/8" by 5 7/8", and glue it to the card base. Take a piece of the Everyday Heroes paper collection and trim it to 5 3/4" by 5 3/4". Sponge it with Black Soot. Glue it to the card. Cut a piece of blue CS to 4 3/8" by 4 5/8". Stamp the My World image on white CS, with black ink. Trim it to 4 1/4" by 4 1/2" sponge the Distress inks randomly over the image. Sponge Black Soot around the edges. Place a few drops of water in your hand and sprinkle it over the image. Take a paper towel to remove any excess water. Take black CS and cut the matching dies, from the Everyday Heroes die set, and glue them on the layered image. Cut the little round sentiment from the Everyday Heroes paper collection, and glue over the world on the image. Add Double Dots to the back and add it to the card.

Thank you so much for stopping by my blog!!
I love reading your wonderful comments, and appreciate them very much.

I have been under the weather, I have missed looking at your beautiful projects. I will be by to see them very soon.

Wednesday, April 8, 2015

April 7, 2015

Welcome to this weeks post with Heartfelt Creations. Our new collection releases today. 
Here is what Heartfelt Creations says about this gorgeous collection.
Stop by Heartfelt Creations blog for more inspiration.
Do you have an unsung hero in your life?  Your champion may never have a medal pinned to his or her chest, but you can demonstrate your gratitude with the Everyday Heroes Collection from Heartfelt Creations.  These epic stamps, dies and papers salute the extraordinary "ordinary people" who inspire us as they live their daily lives with honor and integrity. Grays, teals, khakis, creams and browns have been blended with distressed newsprint, vintage maps, globes, sailing ships, timepieces, combat boots, stripes, dots and flourishes to create a rugged, paper collection that is timeless in its appeal.  Six deeply etched cling stamp sets featuring detailed collages, inspiring sentiments and unique circular elements mesh perfectly with the paper collection and matching set of dies.  Let's sing the praises of the unsung heroes in our lives with the Everyday Heroes Collection from Heartfelt Creations! 

 Products Used:


Project Instructions:

Other products: Neenah White - brown - Eclipse Black - teal cardstock (CS), turquoise beads, flat back pearls, black twine, Ranger Verdigris embossing powder, heat gun, finger sponge
Instructions: Cut a brown piece of CS to 6" x 12" to make a 6" x 6", top folding card base. Take a piece of the Everyday Heroes paper collection and cut a 6" x 6" layer. Glue it to the card base. Take another 6" x 6" piece of paper from the paper collection and tear it in half. Tear one of them a little smaller, and flip it over. Sponge both pieces with the Memento Inks. Glue the two pieces together and then glue them to the card. Sponge around the edges of the entire card, with Rich Cocoa ink. Stamp the My Anchor stamp on some white CS with the Essential Glue Pad. Sprinkle the embossing powder over the image, and heat set it with the heat gun. Tear the edges of the CS around the image. Sponge it with the Memento Inks. Starting with the lightest color. Take a 3" x 3" piece of teal and brown CS and glue it to the back of the image, letting it show at the top right and bottom left of the image. Glue it to the card. Cut the matching dies from the Everyday Hero Die set, in black CS. Cut the largest one in half, and glue it on each side of the image. Glue the beads and pearls around your image, then add the two anchors. Take about 6" of twine and tie one end to the anchor and loop the rest of it around thae image. Add some glue to hold it in place.

Wednesday, March 25, 2015

March 25, 2015

Welcome to this weeks post with Heartfelt Creations
I made a box and four mini cards for you this week. The little cards are so cute. They are just a little over two inches square. I used the gorgeous Peacock Paisley collection this week.
I hope you will find time to stop by Heartfelt Creations blog and see all of 
the beautiful creations.


Instructions
Other Products: Memento Ink - Dandelion - Pear Tart, finger sponge, cardstock (CS) - green - Neenah white - text weight green, unpainted wooden box (Michaels), small sponge, corner punch, turquoise ribbon, Spellbinders Fleur De Lis Square, Copic Markers - Flowers YR15, Y06, E13 - leaves - YG25, Peacock - Y06, G20, YG25, G28, scissors, four beads.
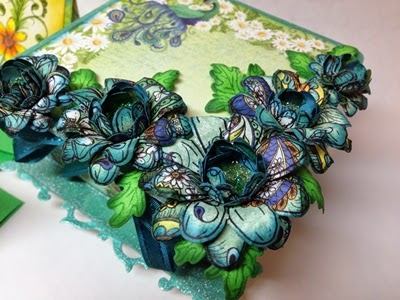
Instructions: Paint the box with the 3D Stamp paint, using a small sponge. Set it aside to dry. Take a 6" by 6" card panel from the Peacock Paisley paper collection and trim it to 3 1/2" by 3 1/2". Round the corners with a corner punch. Take the other 6" by 6" card panel and trim four pieces to 2 3/4" by 3/4" for the sides of the box. Trim another piece to 2 3/8" by 2 3/8" for the inside bottom of the card box. Glue the sides, top, and inside bottom pieces onto the card box. Add the ribbon around the lid of the box, and add a bow to the lid front. Cut/emboss the largest square from the Fleur De Lis die. Paint it with the 3D Stamp paint. Glue it to the bottom of the card box. then glue four beads to the bottom for the feet of the box. Stamp four sets of flowers onto paper from the paper collection, with black ink. Sponge the edges with Teal zeal ink. Mold and shape them with the 4mm tip from the Flower Shaping Kit. Add two flowers for bottom layer, and two flowers for the centers. Add some Art Institute glue to the centers and spoon some of the Green Gala Glitz into each flower, and let it dry. I I have a tutorial on below for making the flowers. Here is a video on using the new Flower Shaping Kit. Stamp four of the small leaves on green CS. Cut them out with the matching die. Sponge the edges with Cottage Ivy ink. Next cut them in smaller pieces and add them around the flowers.
For the four cards inside the box You will need to cut four top folding card bases that are 2 1/4" by 4 1/2". Then you will cut four white layers measuring 2" by 2". Stamp the images from the Daisy Flourish and Peacock Swirls cling stamp set. Stamp them randomly on each one. Then color them with Copic markers. Sponge the edges of each one with Dandelion and Pear Tart ink. Glue them to the card bases. I used a envelope punch board for my little envelopes. Cut four 5" by 5" of green text weight paper, then you will score it at the 2" mark on the punch board. Do not punch them with the included punch on the board. Cut the corners with your scissors instead. Also this is not one of the listed envelope sizes. Trim the corners down a little then fold and glue them.

Take the stamp paint and paint the entire box


Take the  2 3/8" by 2 3/8 piece 
and add it to the inside.


Take the four  2 3/4" by 3/4" strips and 
add them to each side.
Take the 3 1/2 by 3 1/2" piece and round the corners
then add it to the top of the box


Glue the ribbon around the box, and then tie a bow. Add the bow to the ribbon.


Cut each of the pedals apart with scissors.


Stamp four sets of flowers and sponge the edges with Teal Zeal ink.


Here are the four flowers you will need for
each completed flower. Choose two different 
size flowers and Ink the back of the two smaller 
flower with Teal Zeal.


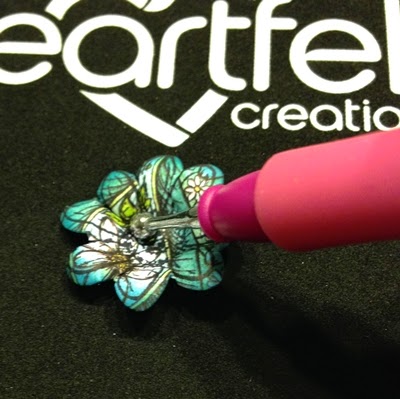
On the inked side take the 4mm stylus 
and pull the edges  of the two flowers 
toward the center to round them. 


Then put the stylus in the center and in a circular
motion go around the center of both flowers. It 
should make the rise up towards the top. I will 
call this one a closed pedal.


For the other two flowers you will flip them over and the take the stylus and pull the edges toward 
the center.I will call this one a open pedal.

Then flip it back over and take the stylus and go 
in a circular motion around the center.


Take the two closed flowers and glue them together. 
Then glue the two open pedals together. Add the closed pedal to the 
center of the open pedal. Then add some  glue to the center 
and add some of the Gala Glitz to the center.


Stamp three leaves. Cut the leaves in smaller pieces. 
Flip the leaves over, and take the 4mm stylus 
and mold the leaves. Press the stylus down, 
and roll it up and around the edges of the leaf.


Add the flowers and leaves to the 
top of the box with glue.


Cut the four card bases and card layers. Stamp the images over each card layer and color them with markers, or your favorite form of coloring. Ink the edges of them with Dandelion and Pear Tart ink. Glue the card layers to the bases. 


I used a punch board to make the envelopes. I didn't use the punch included. I cut the triangles out with scissors. Use the 2" mark to score with. It is not labeled on the punch board. It is the measurements I came up with. 


Here is a another close ups of flowers.

I hope you enjoyed my project this week, and my tutorial. I am still in the learning process
of making tutorials. I hope that each week it will get better.
I really appreciate all of your amazing comments!!!
Thank you so much!


Wednesday, March 18, 2015

March 17, 2015

Welcome to this weeks post with Heartfelt Creations.
I made a card this week, and some really sparkly flowers. I used the amazing 
This is such a gorgeous collection of stamps, papers, and dies. I just love the colors, and flowers in this collection.
I hope you will find time to stop by Heartfelt Creations blog and look at all of the amazing inspiration from the rest of the DT.


Products Used:


Project Instructions:

Other products: Light yellow - light green Cardstock (CS), Koi Water Color Sketch Box, #1 - #2 paint Brush, Say it in Crystals rhinestones, Crystal Stickles, Clear Wink of Stella, water color paper.
Instructions: Cut a piece of yellow CS to 6" by 12", and fold it in half to make a top folding card base. Take a piece of the Peacock Paisley Paper Collection, and cut a 5 3/4" by 5 3/4" layer. Glue it to the card base. Cut another piece of yellow CS to 4" by 5 1/4". Stamp the Paisley image on Water color paper with black ink. Color it with the Koi water color set. Trim it down to 3 3/4" by 5", and add it to the yellow CS. Add Double Dots to the back and place it on the card 1/2" from the right side edge. Brush the Wink of Stella on the image. Stamp four sets of daises on paper from the paper collection. Cut them out with the matching die. Sponge the edges with Tangelo ink. Mold and shape them.Here is a video for flower shaping techniques. Add two to three daises to each flower. Add the flower centers, and then add the Crystal Stickles to each flower. Stamp six of the small daisy leaves in Cottage Ivy ink, then cut them out with the matching die. Sponge the edges with Cottage Ivy ink, shape them, and then cut them in smaller pieces. Add the flowers to the card, and then glue the leaves around the flowers. Cut the sentiment from the Peacock Paisley collection, and add it to the bottom edge of the Paisley image.
I wish you could see IRL, just how 
sparkly these flowers are!!


Thank you for stopping by, and for all of the amazing comments you leave.
I really appreciate it!!

Wednesday, February 4, 2015

February 3, 2015

Welcome to this weeks post with Heartfelt Creations.
I am showcasing the Birds and Blooms collection this week. It has been such a great collection.
I have had so much inspiration from the amazing stamps, dies, and papers.
We will be revealing a new collection next week. 
The Butterfly Medley collections stop by the Heartfelt Creations blog for a sneak peak!!!
You are going to love this one. Especially those of you who love butterflies as much as I do.
Stop by the HC blog and take a look at all of the amazing inspiration from the 
rest of my teammates.


Other Products used: Spellbinders Grand Labels four - Elegant Labels four, Fairway Mica Metallic green - Neenah 80# white cardstock (CS), rhinestones, Copic Markers Flowers R 83 - 85 - 89, Leaves G20 - YG 23 - 94, Branch E 34 - 39, Birds E 31 - 34 - B 21 - 23, Clear Wink of Stella.
Instructions: Make a 7" by 5" card base with white CS. Cut a 7" by 5" layer from the Birds and Blooms paper collection, and place it on the card front. Cut/emboss the largest Elegant labels in white CS. Stamp the Birds and Blooms image in black ink on white CS, then color it with Copic Markers. Cut/emboss it with the fourth largest Grand Labels four. Add Double Dots to the back, and add it to the card. Stamp eighteen blooms with Lilac Posies ink, then cut them out with the matching die. Add Wink of Stella to each flower after molding them with your molding mat and took kit. Add two blooms to each flower then place them on the card. Stamp four sets of leaves from the Leafy branch Cling Stamp Set on the green CS using black ink. Cut them out with the matching die. Sponge them with green ink, then shape them. Place them around the flowers. Cut the sentiment from the paper collection using the Ticket Stub Die, from the Luggage and Tags Die