Welcome to this weeks post with Heartfelt Creations
I made a box and four mini cards for you this week. The little cards are so cute. They are just a little over two inches square. I used the gorgeous Peacock Paisley collection this week.
I hope you will find time to stop by Heartfelt Creations blog and see all of
the beautiful creations.


Products Used:
Peacock Paisley Paper Collection
Daisy Flourish Cling Stamp Set
Peacock Swirls Cling Stamp Set
Delightful Daisies Cling Stamp SetDelightful Daisy Die
Lime Green Metallic 3D Stamp Paint
Deluxe Flower Shaping Kit
Memento Dye Ink Pad - Tuxedo Black
Memento Dye Ink Pad - Cottage Ivy
Memento Dye Ink Pad - Teal Zeal
Art Institute Glue - Dries Clear
Metal Glue Tip - Art Institute
Green Gala Glitz
Peacock Paisley Paper Collection
Daisy Flourish Cling Stamp Set
Peacock Swirls Cling Stamp Set
Delightful Daisies Cling Stamp SetDelightful Daisy Die
Lime Green Metallic 3D Stamp Paint
Deluxe Flower Shaping Kit
Memento Dye Ink Pad - Tuxedo Black
Memento Dye Ink Pad - Cottage Ivy
Memento Dye Ink Pad - Teal Zeal
Art Institute Glue - Dries Clear
Metal Glue Tip - Art Institute
Green Gala Glitz
Instructions
Other Products: Memento Ink - Dandelion - Pear Tart, finger sponge, cardstock (CS) - green - Neenah white - text weight green, unpainted wooden box (Michaels), small sponge, corner punch, turquoise ribbon, Spellbinders Fleur De Lis Square, Copic Markers - Flowers YR15, Y06, E13 - leaves - YG25, Peacock - Y06, G20, YG25, G28, scissors, four beads.
Instructions: Paint the box with the 3D Stamp paint, using a small sponge. Set it aside to dry. Take a 6" by 6" card panel from the Peacock Paisley paper collection and trim it to 3 1/2" by 3 1/2". Round the corners with a corner punch. Take the other 6" by 6" card panel and trim four pieces to 2 3/4" by 3/4" for the sides of the box. Trim another piece to 2 3/8" by 2 3/8" for the inside bottom of the card box. Glue the sides, top, and inside bottom pieces onto the card box. Add the ribbon around the lid of the box, and add a bow to the lid front. Cut/emboss the largest square from the Fleur De Lis die. Paint it with the 3D Stamp paint. Glue it to the bottom of the card box. then glue four beads to the bottom for the feet of the box. Stamp four sets of flowers onto paper from the paper collection, with black ink. Sponge the edges with Teal zeal ink. Mold and shape them with the 4mm tip from the Flower Shaping Kit. Add two flowers for bottom layer, and two flowers for the centers. Add some Art Institute glue to the centers and spoon some of the Green Gala Glitz into each flower, and let it dry. I I have a tutorial on below for making the flowers. Here is a video on using the new Flower Shaping Kit. Stamp four of the small leaves on green CS. Cut them out with the matching die. Sponge the edges with Cottage Ivy ink. Next cut them in smaller pieces and add them around the flowers.
For the four cards inside the box You will need to cut four top folding card bases that are 2 1/4" by 4 1/2". Then you will cut four white layers measuring 2" by 2". Stamp the images from the Daisy Flourish and Peacock Swirls cling stamp set. Stamp them randomly on each one. Then color them with Copic markers. Sponge the edges of each one with Dandelion and Pear Tart ink. Glue them to the card bases. I used a envelope punch board for my little envelopes. Cut four 5" by 5" of green text weight paper, then you will score it at the 2" mark on the punch board. Do not punch them with the included punch on the board. Cut the corners with your scissors instead. Also this is not one of the listed envelope sizes. Trim the corners down a little then fold and glue them.
Take the stamp paint and paint the entire box

Take the 2 3/8" by 2 3/8 piece
and add it to the inside.

Take the four 2 3/4" by 3/4" strips and
add them to each side.

Take the 3 1/2 by 3 1/2" piece and round the corners
then add it to the top of the box

Glue the ribbon around the box, and then tie a bow. Add the bow to the ribbon.

Cut each of the pedals apart with scissors.

Stamp four sets of flowers and sponge the edges with Teal Zeal ink.

Here are the four flowers you will need for
each completed flower. Choose two different
size flowers and Ink the back of the two smaller
flower with Teal Zeal.
flower with Teal Zeal.

On the inked side take the 4mm stylus
and pull the edges of the two flowers
toward the center to round them.

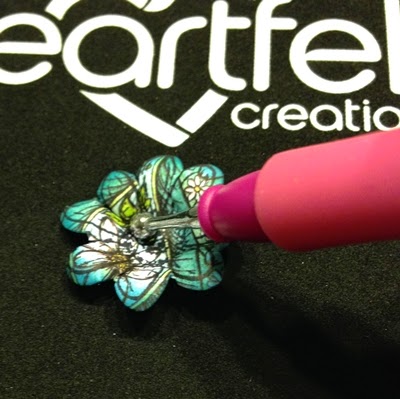
Then put the stylus in the center and in a circular
motion go around the center of both flowers. It
should make the rise up towards the top. I will
call this one a closed pedal.

For the other two flowers you will flip them over and the take the stylus and pull the edges toward
the center.I will call this one a open pedal.

Then flip it back over and take the stylus and go
in a circular motion around the center.
Take the two closed flowers and glue them together.
Then glue the two open pedals together. Add the closed pedal to the
center of the open pedal. Then add some glue to the center
and add some of the Gala Glitz to the center.

Stamp three leaves. Cut the leaves in smaller pieces.
Flip the leaves over, and take the 4mm stylus
and mold the leaves. Press the stylus down,
and roll it up and around the edges of the leaf.

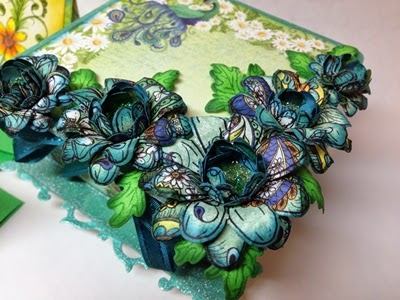
Add the flowers and leaves to the
top of the box with glue.
Cut the four card bases and card layers. Stamp the images over each card layer and color them with markers, or your favorite form of coloring. Ink the edges of them with Dandelion and Pear Tart ink. Glue the card layers to the bases.

I used a punch board to make the envelopes. I didn't use the punch included. I cut the triangles out with scissors. Use the 2" mark to score with. It is not labeled on the punch board. It is the measurements I came up with.

Here is a another close ups of flowers.
I hope you enjoyed my project this week, and my tutorial. I am still in the learning process
of making tutorials. I hope that each week it will get better.
I really appreciate all of your amazing comments!!!
Thank you so much!


.JPG)
